What do you need to build a motor, and the function of it:
It is amazing to find out that to build a simple motor you only need: paper clips, a battery, copper wire and a magnet. With a motor like the one we built in class you could build things like a blander, a fan or anything else that relies on a spinning axle.
The copper wire is used to create a loop that is held above a magnet. A current flows through the paper clips on each side of the battery to the copper wire, which completes the circuit.
The magnet creates a magnetic field that works to works with the current to form the force that will cause the copper wire to spin.
The Picture above gives a visual representation for the reason why the copper wire is forced to spin. Like we said before the battery provides a current that is conducted by the paper clips to the copper loop. That current moves through one side of the loop and back through the other. The magnet is placed on top of the battery (under the loop) and creates a magnetic field that points up. If we use the rule that is exemplified by the hand above we can find out which way the force, resulting from the current and the magnetic field (A current carrying wire feels a force in a magnetic field), will push. That is the way we can determine where to scrape the armature. This step, which does not seem too important, is a main component in the function of the motor. By using the finger rule we decided to scrape when one side of the loop is vertical to the battery, because that is when the force would push the loop in a way that it would cause it to turn. Here is a link of my motor! http://www.youtube.com/watch?v=ZmY9sdaeWWI
This unit was all about energy electricity! We learned how lightnings work, how are houses are wired, why energy flows, what voltage is and much more! One of the first things we established and that helped us through the entire unit was that opposite charges attract each other, and like charges repel. Charges can never be destroyed, only transferred and electrons (negative charges) can move better than protons (positive charges) because they are not bound to the nucleus as the protons are. After learning the relationship of charges we establish what we call Coulomb's Law represented by the equation:
F = (K q1q2) /d²
Coulomb's law means that the closer something is to another, the greater the force between them is - Distance is inversely proportional to force.
Electric fields was a concept that I did not understand in the beginning of this unit. I latter found out that it was simply the area where a force can be felt. The complicated pictures with arrows only symbolized where a positive test charge would move. The equations for electric field are:
E = F/q
and
E = (K q1q2)/d²
Another concept learned was the difference between a insulator and a conductor. Conductor's electrons are free to move and an insulator's electrons are closely bound to particular atoms.
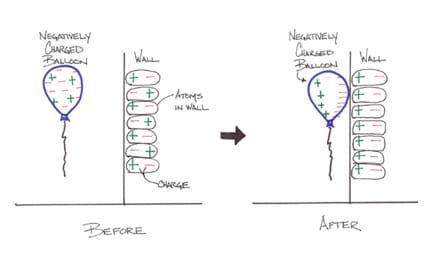
Now we can put together Coulomb's law, the relationship of charges and the concept of insulator and conductor we can explain why a balloon can stick to a wall for example.
Here is why the boy can stick the balloon to the wall after rubbing it to his sister's hair. When he rubs the balloon in the baby's head the balloon picks up electrons from the hair and becomes negatively charged (by friction). After that, he puts the balloon on the wall. Because the wall is an insulator the electrons of the balloon will not be stolen by the wall, but the charges will rearrange in a way that the positive charges will move close to the negatively charged balloon, and the negative charges of the wall will move as far away from it as possible. This process of rearrangement of charges is called polarization. The illustration bellow shows what the charges of the balloon and the wall look before and after polarization. You might be wondering why it sticks if there is also a force of repulsion between the like charges of the balloon and wall. Here is when Coulomb's law comes in handy! Coulomb's law says that distance is inversely proportional to force so since the opposite charges are closer together, the force of attraction is stronger than the force of repulsion, therefore the balloon sticks to the wall!
The same idea that explains a balloon sticking to the wall can explain why the comb of the video bellow can attract the water. The comb is negatively charged and the water is neutral. The charges of the water become polarized and because of Coulomb's the attractive force wins once again!
There are many ways of charging an object, one of them we already mentioned before and that is friction. When something rubs against another electrons tend to be transfered therefore charging it through friction (like the balloon that picked up electrons from the hair). Another way of charging an object is byinduction; induction happens when something is charges without touch.An example of induction is the formation of lightings. Lightning is caused by a combination of facts. All starts when clouds rubb against each other and the bottom of the clouds become negatively charged by friction. The negative charges of the clouds attract the positive charges of the ground by induction, because opposite charges attract. Like charges repel, therefore the negative charges of the ground will go deep into the ground. The attraction of the electrons of the clouds and the protons of the ground is so great that the charges create a path so that they can travel from cloud to ground and ground to clouds. This exchange of charges emmits the light we see and call lightning.
We can't avoid having lightning strikes, but how can you protect your house from them? Lightning rods can protect your house of the damish lightnings can cause. For an unknown reason, positive charges build up on sharp points and that is exactly what lighting rods have. The rod will be placed on your roof and because of the positive charges that build up on it when there is a lightning the electrons from the clouds will be attracted to those charges. When the lightining strikes the rod the charges will flow through a metal wire that will ground the charges protecting your house from it.
From the begging of the unit we learned that for charge to flow there needs to be a complete circuit, and later on we learned that for current to flow there also needs to be an electric potential difference. The voltages from one place to the othere needs to be different.
A capacitor is what makes the potential difference to create a circuit. It builds up electric potential difference by having two oppositely charged plates (they are attracted to each other). This is the mechanics behind a defibrillator and the flash on a camera. In a defibrillator the electric potential difference is build between the plates, and the circuit is complete when they touch the patient's body. The energy flows through the person and the defibrillator needs to charge, so that the electric potential difference can be built up again.
When talking about how current flows we learned that voltage doesn't move through a circuit but "pushes" current through. We also learned about resistance it is basically how much an appliance oposes the passage of current through a circuit. Resistance is not the only determinant of resistance, here are some other factors:
Length (the longest the more resistance)
Width (The wider the less resistance)
Temperature (The hotter the more resistance)
Material
After learning this deffinitions we found out that:
Current = Voltage / Resistance
With the equation above is easy to analyse the affect of resistance in current. Now you can explain why light bulbs blow right after they are turned on because you know the effect of a cold temperature to resistance and the effect of resistance to current.
Power = Current x Voltage
This equation relates to watts. You will probably come across a light bulb that has a label saying how many watts it uses. Withe the equation above you can find how much current passes through the circuit for each light bulb therefore you can find how bright they are.
We talked a lot about this equation when we tried to figure it out why a van de Graaff generator, that has a high voltage, doesn't hurt you, but an outlet that has a much lower voltage does. We stablished that what hurts you is not volte but energy. We used the equation above to plug in the voltage and charge in order to find how much energy the outlet, and the generator had. We found that the generator has a small energy and the outlet has a big one therefore it is safe to touch the generator but not the outlet.
The last thing we learned about was parallel and series circuits. In the image above you can see an example of series circuit (left) and a parallel circuit (right). The main difference between the circuits is the effect of switching one of the appliances off. In the series circuit all appliances would go off if one got of'; in parallel the other appliances would keep on working. Because of that, our houses are wired in parallel. We also discovered in a lab that a parallel circuit has more "lanes" and therefore the resistance is lower and since I = V/R the current is greater. Series has more "stoplights" therefore the resistance is higher and current is lower. We said earlier in the post that current is directly proportional to the brightness/efficiency of an appliance, therefore the bulbs in parallel would be brighter than the ones in series. Another important thing to remember is the role of fuses in a circuit. Fuses are wired in series and they are sensitive to the amount of current in that circuit, if the current gets to high so that it becomes dangerous, the filament of the fuse will break causing the current to stop flowing. That might be extremely annoying if it happens in your house, but is saving you from a possible fire. But why would the current go up? In a parallel current the more appliances you plug in the system the higher the current will get! In a series circuit on the other hand, the total current remains the same and the individual goes down.
Reflection:
What I found the most difficult in this unit was connecting one concept with the other. Because the unit was long, it was hard to remember equations and to what they related to. The idea of voltage, electric potential energy, and electric potential sometimes seemed to be the same exact thing. The way I overcame this problems was by making many mistakes in homework assignments and quizzes, and looking back to my notes after that and finding out what I did wrong. Coming in for help and asking questions also was a great tool to finally understand this sometimes confusing topics.
Newton’s First Law states that an object at rest wants to stay at rest and an object in motion wants to stay in motion unless an outside force acts on it. Newton’s first law can be observed in a mousetrap car because is evident that the car does not want to move until an outside force acts on it, and then it takes another outside force to make it stop moving, the force of friction. Newton’s second Law states that a = Fnet/m. That Law is also noticeable in the cars because none of the cars of our class were heavy. All of the students made their cars light and that works because the more massive your car is the smaller the acceleration will be. Newton’s third Law states that for every action there is an equal and opposite reaction. As the mousetrap car moved across the floor, gravity was pushing it down and the car was pushing the floor up also, car pushes floor backward, floor pushes car forward. My partner and I decided to use four wheels to keep the car balanced; its center of mass needs to be under its base. We first chose to use small wheels but after many failed trials we decided to switch them to large wheels. Large wheels worked better because they have less rotational inertia so they are easier to start and they are a lot more stable. They have less rotational inertia because their mass is more evenly distributed. Friction between the wheels and the floor is necessary to propel the car forward but air resistance or the lever arm dragging on the floor is something you want to avoid. Conservation of energy means that the energy in is equal to the energy out. On the mousetrap car the extended lever adds Potential Energy to the car. When the mousetrap car is moving the lever arm moves down losing potential energy and gaining Kinetic Energy that through the string attached to the axle of the car is used to turn it and move the car. We first started using a short lever arm and at the end we decided to use a lever arm a lot longer than the first one. A longer lever pulls more string and that makes the axle spin better. The farther the string is pulled the more energy is given to the axles.Rotational inertia and velocity are a factor when it comes to the wheels of the car. You do not want the wheels to be like a loop because that would make the concentration of mass be in the outer part of the wheel increasing the rotational inertia. The more rotational inertial something has, the more resistant to a change in motion it will be. Tangential velocity has to do with the radial distance and rotational velocity, the larger the wheel the more tangential velocity it will have. The rotational velocity also needs to be as great as possible, that means the axle needs to spin fast! With the combination of a big wheel and an axle that spins fast, the wheels should have a great tangential velocity.
Reflection: Our design changed a lot from the begging of the project to the end. The size of the wheels were the main change. We started with small wheels that did not even make the car move at all. After that we change to large wheels on the back and small wheels on the front. We found that in order for the string to spin the axle, it had to be taped to the axle and that a larger lever arm is more effective than a short one. The changes were made because our original design was not causing the car to move. Another big problem we’ve encountered was making the wheels stables enough. By using only tape and cardboard wheels it is difficult to make the wheels stay in place. The solution we found to this problem was to tape the wheels to the axle on the outside and inside of them. If I had to do this project again I would start with large wheels a large lever and a more stable base. I would also spend more time planing which materials to use so it would save me time on the construction.
Work:
The first thing we talked about in this unit was about work! Work is the effort put n something that changes its energy. The equation for work is;
work = fd
It is really important to remember that the force and distance of the equation above have to be parallel! That mean that if someone is walking around (on a flat surface) carying a tray he is not doing any work on it. The distance the person is going is perpendicular to the force that is pushing the tray up. Now imagine that someone is walking up the stairs, the distance now is parallel to the force, that in this case is the weight of the person. Remember that if you were to calculate the work done by the person climbing up the stairs you wold use the distance from the very top straight down, not the diagonal extension of the stairs! What matters in the stairs scenario is how far up from the ground you are, not how much distance you walked. Remember that if you are pushing against a wall, you are not doing work on the wall since its not moving, but you are doing work within yourself inside your body.
Power:
Power is a rate of how fast work is being done! The equations for power is
Power = work/time
Imagine that there is a race up the stairs and both participants have the same weight (force is constant), which of the competitors would have more power? The one that won the race! The winer of the race would have more power because he would have done the same amount of work (since the distance and force are constant) in a shorter amount of time!
Potential Energy:
Pontial Energy is the energy of possition, is the energy stored in "readiness", the energy that has the potential of doing work. Because Potential Energy is the energy of possition, ther higher something is from the ground the more PE it has! The Equation for Potential Energy is:
PE = mgh
Kinetic Energy:
Kinetic Energy is the energy of movement! The faster something is moving the more kinetic energy it has. The equation for Kinetic Energy is
KE = 1/2mv2
Another important thing to remember about KE is that the change in kinetic energy is equal to work. Therefore...
change in KE = fd
Work = 1/2 mv2
Conservation of Energy:
Conservation of Energy's simple deffinition is enegy in is equal to energy out! Based on that deffinition we can talk about the relationship between the kinetic energy and potential energy. Let's say that there is a person jumping from a rock to the sea, when the person is on the top of the rock and about to jump he has PE. When he jumps from the rock he loses height and therefore loses PE (PE = mgh), but since we have established that energy in is equal to energy out, the energy can't be lost right? Right, the energy is being transformed from PE to KE. Now the person does not have as much height but it is a greater velocity therefore no energy is lost, it is only transfered.
The same idea applies to roller coasters, the same hill is always the highest one so that it accumulates enough energy to go through all the elevations. As the car goes down, the PE goes down but KE goes up. If added together at any part of the ride, the KE and PE of the car will equal the PE that the car had on the first hill.
Machines:
Machines can be understood by using the concept of conservation of energy. We said earlier that energy in = energy out and that change in KE = work. That means that the work in also equals the work out! A machine works by increasing the distance you put in in order to decrease the force (work = fd). To decrease the force you have to exert, you will have to pull for a longer distance and the distance that the object will move will be smaller that the one you pulled. Regardless of how the distances turn out to be the work in wil always equal the work out.
Efficiency:
In real life no machine works with 100% efficiency. There is always some energy that is transformed in something else, like in heat due to friction. The efficiency of a machine can be meassure by dividing the energy output by the energy input.
Reflection:
The first part of this unit was easy to understand. The concept of work seemed easy enough to understand. On the quizzes about work tough... I fell for every single one of the questions that asked how much work someone walking with their books is doing. No work, the answer is no work! I found it hard not to be ready to plug in numbers that were given to me before analising if there was any work being done at all. When question asked for me to say what would happened to the work if the velocity was doubled I also got a little confused but after going over on of those questions with my teacher I now know what to do! The questions about the change in kinetic energy, when the velocity went from a number to another also tricked me. I made the mistake of calculating the difference in velocity first and using that number in the kinetic energy formular, while I learned that I should have calculated the kinetic energy of each individually, and then found the difference. This energy was easy in theory but complicated in practice but after looking back to some quizzes I found out what mistakes I made and now know what not to do!
Once again the construction of the car did not go as smoothly as we imagined... We drilled a whole and added the four eye-hooks and then tried to cut the axle out of the wood stick we bought. We planed on connecting everything with the zip ties, but that was the part that did not work as predicted. We all of the four wheels on the axle and placed one zip tie of each side of all the wheels. The wheels did not move out of place but they did not spin faster either. Mrs. Lawrence than suggested that we used tape instead of the zip ties, and that idea in fact was a lot more effective. My partner and I also observed that the wheels were not aligned, and that might also be the reason for the them to be unstable. We took everything apart and made sure that the axle were of the same length, and started to put the same amount of tape on each end of the wood stick so that the wheels are the same distance from the car. That was when our time was done!
The first day of construction of the car did not go as me and my partner expected... We began by trying to get the wheels off the toy car we bought. The wheels did not seem to want to come out at all, and soon we found out that it was because the car was a remote controlled so it did not have an axle! That was a big disappointment because we planed on using the axle from the toy car on our mouse trap car. We were finally able to take the wheel off and decided to use the wood stick, we had bought for extending the lever of the mouse trap, as the axle. We drilled a whole on the four wheels so that they fit through the wood stick, and on the mouse trap so we could insert the eye hooks on the second construction day. Our first day of construction was not as easy as I expected it to be, but we ended up figuring out how to make it work! Looking forward for the second day of construction!
My partner and I had no idea how to build a mousetrap car so we looked up some videos on the internet and found this tutorial that was really helpful on understanding what we had to do. One interesting thing about the mousetrap car on the video is that the frame is the mousetrap! My partner and I thought that might be a really good idea to not use a frame so the car would be lighter. We plan to follow the video but make a few adjustments. We are going to start with the eye-hooks and the wheels from toy car seemed to work pretty effectively. Extending the lever was also something we saw be done on every video about mousetraps so we plan to do that too. The one thing we did not like about the way the car from the video bellow was built was that the wheels could move from left to right and that can cause the car to curve. To solve this problem we thought that we could maybe use zip ties on each side to keep the wheel from shifting without stopping them to turn. So our plan step by step is:
1. Buy eye-hooks, rubber bands, wood stick, two toy cars (with different sizes of wheels) and zip ties;
2. Unlock the mousetrap;
3. Lengthen the lever with the wood stick and attached with three zip ties;
4. Make a whole on the sides of the mousetrap with a pin and place the eye-hooks on the wholes;
5. Take the wheels out of the toy cars and put the larger wheels though the eye-hooks on the back side of the car and the small one in front;
6. Fix the wheels with a zip tie on each side of the wheels so that it wont move side to side and put the rubber bands around each tire;
7. Attach the string;
8. Win the race!!!